


What is Marquetry?
A Brief History
While the exact origins of marquetry are unknown, it is known that ancient artisans devised techniques to create objects decorated with exquisite inlays of wood, stone, metal, shell, bone, ivory and other exotic materials. They would carve out a recess and fill in the resulting void with the material of their choice, using glues made by heating the bones or skins of animals or fish. Egyptian hieroglyphs and paintings indicate that veneers were cut with bronze adzes and applied as decorative elements to caskets. At this time mosaic work was also widespread, so it can be imagined that it did not take long for craftsmen to start experimenting with designs formed from different veneers.
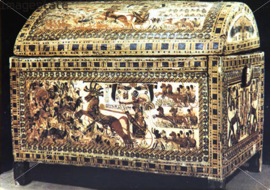
Painted and inlaid coffer from the Treasure of Tutankhamen
Ancient Egyptian (c1325 BC) Unknown Artist
With the ability to now very accurately cut thin sheets of wood, bone, ivory, shell and other materials into nearly arbitrarily complex shapes, 16th century craftsman began to piece together these materials and shapes into more complex images. The approach, now termed “marquetry” from the French marqueter (“to inlay as on a piece of furniture”), involved the cutting, fitting and gluing of pieces of material into a single sheet and then gluing the resulting sheet down onto a substrate. As such, marquetry differed substantially from inlay in that the design was essentially completed before being attached to the end piece of furniture, rather than being used as an element within the end piece.
The earliest known example of marquetry (1563) is from Breslau, Germany (see figure below).
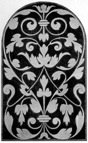
Marquetry Panel from the Rathaus, Breslau, Germany 1563
During the 16th to 18th centuries much exquisite work was produced focused primarily on decorating furniture, especially for royalty.
By the early 17th century, marquetry largely replaced inlaid decoration in furniture. Floral designs and “seaweed” marquetry (having the form of symmetrical, foliate scrolls) became quite popular design elements in furniture of the period.
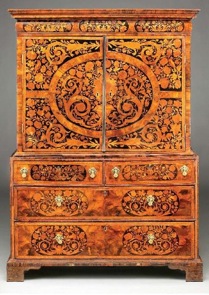
William & Mary Seaweed Marquetry Cabinet on Chest
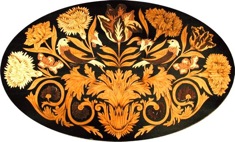
Floral Marquetry Table Top 17th Century
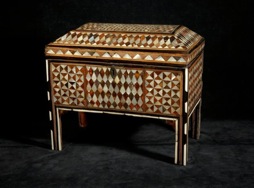
Parquetry domed box, Turkey early 18th century
Today there are a handful of professional marquetarians, however, it is often the amateur who produces some of the finest work. Unrestricted by commercial concerns, they are able to develop new techniques which are often labor intensive, advancing this unique art form to new standards.
Modern Marquetry Techniques
The primary material used in marquetry today consists of a variety of natural wood veneers. These veneers come from literally thousands of species of trees from around the world. Depending on the type of cut used on the tree to produce the veneer, and the color of the wood itself, the appearance of the veneer may vary greatly in both grain and color.
The marquetry artist, or marquetarian, selects the veneers based on the right combination of grain, color, and texture needed to create the desired artistic impression. Next, a pattern is chosen and the individual veneer pieces that will make up the design or picture are cut out using either a knife or a fret saw. Following this, the pieces are glued together and the completed design is mounted onto a rigid base and sanded flat.
Finally, a finish is applied to protect the wood and the marquetry piece is completed. The infinite variety of veneers, grain, and figuration insures a unique one-of-a-kind product every time.
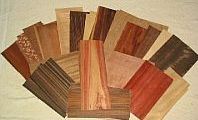
Veneer samples

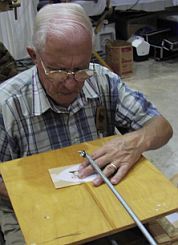
Cutting the design
Today, there are many different techniques used to cut veneers to create marquetry designs. The three most common are: Window Method, Pad Method and Double-Bevel Marquetry.
Window Method
In the Window Method, the design is traced onto the veneer using black carbon paper. The shape is then cut out, taking care to keep the knife upright so that the edge of the cut is clean and vertical.
The veneer to be inserted into the resulting cutout is then placed behind the resulting hole, or "window", and moved until the desired effect of color, figure and grain is seen. The insert veneer is then secured in place with a few small pieces of tape and the required piece is cut, using the edge of the "window" as a cutting guide.
The insert piece is removed from its leaf, gently pressed into the "window" and taped lightly. Glue is rubbed into the joints to fasten the insert in place and shortly afterwards the tape can be removed. Each piece is added in this way, eventually ending up with the finished picture the thickness of a single sheet of veneer.
Advantages
The key advantages of the "window" method are two-fold:
First of all, the insert veneer can be moved around behind the window to yield the exact effect desired, thus allowing the best use of the grain, color and figure of the veneer.
Secondly, the window itself is used as the template. Therefore, the insert must (theoretically) fit perfectly into the window.
Disadvantages
The process can be quite fatiguing on the hand, as one needs to maintain a firm grip on the knife handle and make continued cuts in the multiple veneers.
It is essential to make multiple light passes in cutting out the veneers, or else the knife blade can end up following the grain of the wood instead of the desired trajectory. As a consequence, the process can be quite time consuming.
To achieve a tight fit between the insert piece and the background veneer, one must tilt the blade slightly (a few degrees) away from the cut so as to bevel the edges of the insert piece. Keeping a constant bevel angle is somewhat difficult to do by hand. (See double-bevel technique below.)
The finite kerf of the knife blade will typically result in a gap around the window insert which must be filled with glue or colored epoxy. In some cases, this is a desired effect (e.g., floral designs in 17th century marquetry). In others, it can result in distracting lines.
Only one image can be made at a time. The Window Method is not a production approach.
Pad Method
In the Pad Method, several pieces of soft waste veneer (at least the size of the finished picture) are stacked together into a "pad," and good veneers are interleaved among them for the cutting. To make up the pad, the good veneers are positioned on the waste veneer according to their place in the final picture and fastened with masking tape. Adjacent veneers are typically placed on different waste veneer layers so that there is no direct overlapping. In this way the pad is built up of alternate layers of waste and good veneers, and the assembled pad can be tightly compressed during the cutting. The top layer consists of a piece of waste veneer on which the cutting pattern is glued. The average picture may require a pad having six or so such layers.
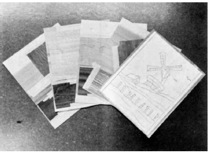
Typical pad composition
Advantages
Once the pad is constructed, cutting can proceed quite quickly with all the pieces cut out at once. The process can be used to create several copies of the same design at once – simply add another veneer layer.
Disadvantages
Ideally, if the saw blade had no thickness, the pad method would produce perfectly fitting joints. However, like the Window Method above, the thickness of the blade, slight as it is, prevents a tight fit and results in kerf-width borders around each design element. The grain pattern and direction of the veneer design element must be approximated, since cutting is blind once the pad is assembled. A further disadvantage of the technique is the wastage of veneers.
Double-Bevel Marquetry
The double-bevel technique uses a scrollsaw (or fretsaw if performed manually) with the table tilted at an angle. Essentially, you’ll be cutting two pieces of veneer, and the bevel created by the angle of the table allows the bottom veneer to fit perfectly into the top veneer.
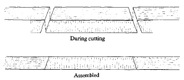
Double-bevel cutting and assembly
The first step is to select your background veneer. This is the piece that the artwork will be drawn onto and the veneer elements cut into. Make sure that it fits the length of your scrollsaw. If your table is 18" deep, you won’t be able to cut toward the end of a 24" piece!
Next, draw your design onto some tracing paper along with two reference marks. Tape the tracing paper to the background veneer, slide graphite paper underneath and trace the design and reference marks onto the background veneer. (Alternatively, you can tape your design on one edge of the background veneer, and trace individual design elements as you go. By taping it to the background, you’ve essentially pinned it in place and subsequent drawings will automatically be aligned properly.)
Now you can select from a wide variety of woods to choose the most appropriate color and grain pattern to complement your design. Once you have selected an appropriate piece of veneer, tape it to the back of the background veneer making sure it's positioned to fully cover the area to be cut out and well secured with tape (to prevent up/down and side-to-side slippages).
Using a pin vise with a tiny drill bit just slightly larger than the scrollsaw blade, place it just slightly inside the pencil line. Angle the drill bit at the same angle as the blade (easiest done by placing the background veneer flat on the angled saw table and keeping the pin vise vertical), and drill a hole.
Next, flip the workpiece over and ease the edges of the exit hole with a countersink bit or a sharp knife. You can also use a pencil to draw a circle around the hole. This makes it easier to find the hole and thread the blade. Flipping the workpiece back over, thread the blade making sure the teeth are facing down and orient the background veneer so that the piece to be cut out is to the right side of the blade and the table is angled down to the left.
After clamping the top of the blade in place with mild tension, begin cutting, rotating the stock clockwise. With the cut complete, test the fit. It should be snug but if it isn't, adjust the angle of the table. Increasing the angle will make a tighter fit. Once you're happy, glue it in and continue. Subsequent cuts will overlap previous cuts, producing depth as you create foreground pieces that overlap background pieces.
Advantages
With proper adjustment of the table angle to compensate for veneer thickness and blade kerf, it is possible to create an image which has absolutely no gaps between design elements. This is true even if the saw blade wanders from its desired course.
Extremely fine details can easily be added to an image. This is particularly true when using thicker veneers, as the double-bevel angle is very small and will not produce any undercutting of design features.
Disadvantages
As with the Window Method, only one image at a time can be constructed.